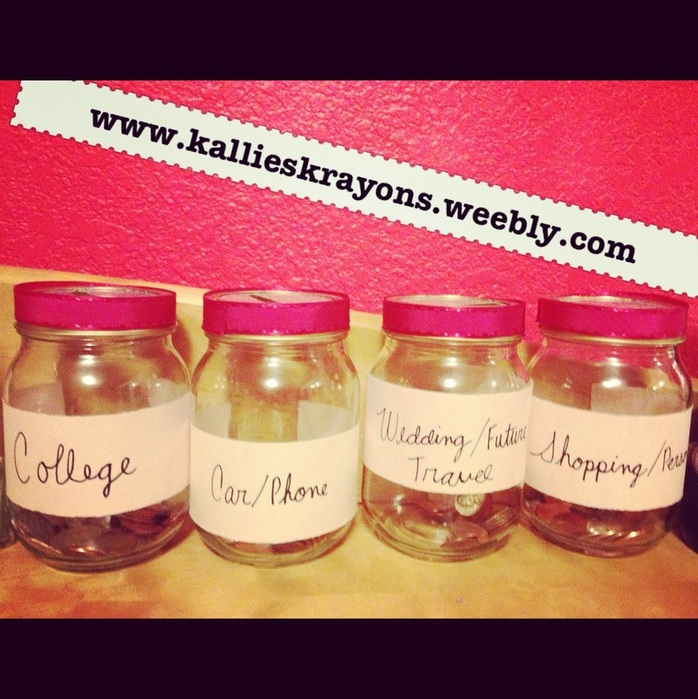
Simple Money Jars
Notes:
~You can be as creative as you want with these cheap and simple money jars. For example, add lace, sequins, beads, photos, ribbon, glitter, etc to your jars for a more personalized look.
~The idea is, whenever you receive change, put all of it in the jar of your choice. Maybe one day you put in in the first jar and the second day in the second jar, or put the most change in the first jar (for example, 25 cents), then 10 cents in the second jar, etc, etc.
What you'll need:
Jars (Amount depends on how many things you want to save up for.)
Creative supplies as listed in the notes section
Glue
Paper
A pen
Scissors
Step 1: Trace circles on paper around the jar lid. Cut these circles out.
Step 2: Cut slits big enough for change and/or bills.
Step 3: Place the papers in the lids.
Step 4: Cut ribbon long enough to be wrapped around the lid. Glue into place.
Step 5: Cut strips of paper and write what you want to save money for.
Step 6: Tape or glue these to the jar.
Step 7: I wanted to keep these jars very simple, but girly. I didn't do much decorating or embellishing. Add anything creative to your jars to personalize them!
Step 8: Start saving!
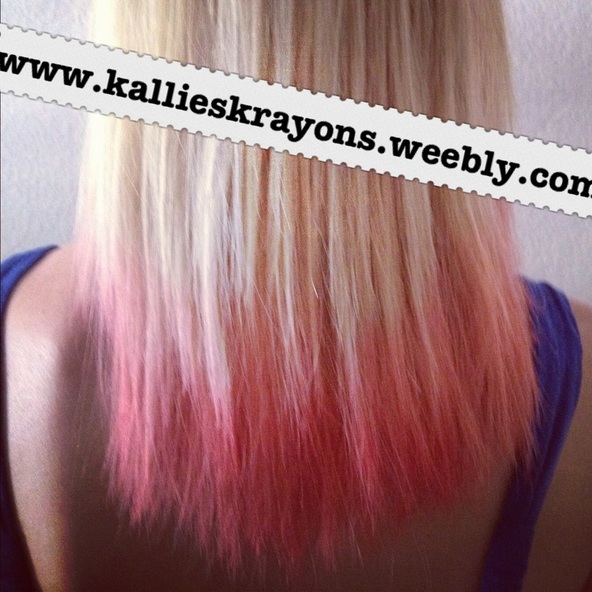
Kool Aid Temporary Hair Dye
Warnings!
~Kool Aid dye works BEST on very light hair. If you want the best results, get your hair bleached and then follow these simple steps. With dark hair you can see Kool Aid dyed hair best in light.
~Kool Aid stains any cloth VERY easily, be careful.
~At the end of this process, do not be worried if it seems like you are losing hair. The reason there is so much hair in your hairbrush is because the Kool aid clumps in your hair and you just have to brush out the knots.
~Beware of bugs being attracted to your fruity smelling hair!
~In my experience, the dye fully washed out in 1 week.
Notes!
~Kool Aid is very inexpensive and dying with it is a cheap alternative to temporary and permanent hair dye.
~Some colors may not turn out as expected; they may be lighter or darker. Take a small bowl and pour a small amount of the powder on it. Add a few drops of water in order to see what the dye will actually look like.
~Dry, damaged hair works best for dying!
~This process takes approximately 1 hour.
Step 1: Purchase the color(s) you want to dye your hair with. Choose the Kool Aid carefully depending on strength of the color(s) or if you want to mix the colors. (I used 2 cherry, and 5 pink lemonade packets. Make sure the package reads "sugar free" or "add sugar" because you dont want your hair to attract bugs or be a sticky mess!
Step 2: Pour the packets into a pot and add just enough water to stir in the powder.
Step 3: Boil the mixture.
Step 4: Make sure the mixture is cool enough to be poured into a bowl or cup.
Step 5: Dip hair into the bowl/cup for about 5 minutes for each section you decide to do. Make sure the mixture is still fairly hot. (I dipped my hair section by section and hoped the color turned out even.)
Step 6: Place a towel around your shoulders and let your hair dry.
Step 7: Use heat (a straightener or blow dryer) to make the color last longer.
Step 8: Hop in the shower and use shampoo and LOTS of conditioner. The Kool Aid mixture is very sticky.
Step 9: While your hair is drying, repeatedly comb through your hair to rid of the sugar-tangled hair.
Step 10: Do your hair for the day and enjoy!
Send in your hair creations at the bottom of this page inspired by the picture above to be on this website! Thanks!
Rainbow Cupcakes!

Step 1: Purchase a flavored (chocolate, vanilla, etc) cake mix, cupcake pans, cupcake paper liners, icing, and food coloring (pink, red, orange, yellow, green, blue, purple). Make sure you have all ingredients needed for the cake mix.
Step 2: Make the cake mix.
Step 3: Pour the mix into however many bowls you need for the number of colors you want in your cupcakes.
Step 4: Put different drops of food coloring in each seperate bowl and mix well. Feel free to add 3-4 drops to each bowl, or else the cupcakes will taste too chemically.
Step 5: Start filling each cupcake liner in the cupcake pans with one color. After that color has been placed into each cupcake hole, pour another color on top until you have used each color. I recommend a spoonfull for each layer. This step is very tedious and time consuming. You must have patience.
Step 6: Bake the cupcakes according to the cake mix box instrustions. If you live in a high
elevation, be sure to follow those instructions.
Step 7: Let the cupcakes bake. Check them with a toothpick to see if they have been fully baked. (If the toothpick comes out clean, they are ready to be taken out of the oven).
Step 8: Let them cool for about 15 minutes.
Step 9: Ice the cupcakes and enjoy!
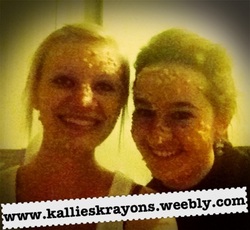
Homemade Facials
What you'll need:
1 peach
1.5 tablespoons of honey
2.5 tablespoons of oats or oatmeal (the smaller, the better)
An oven
A blender
2 bowls
A spoon
Water
Step 1: Peel and bake the peach in the oven until very squishy.
Step 2: Once the peach is squishy, place in the blender with honey. Blend together thouroughly until all peach chunks are gone.
Step 3: Pour mixture into a bowl.
Step 4: With the empty bowl, add 5-6 tablespoons of water to the 2.5 tablespoons of oats or oatmeal. Microwave until fully cooked.
Step 5: Once cooked, add the oats to the peach and honey mixture. Stir in thouroughly.
Step 6: Apply to face and let it dry for 15-25 minutes.
Step 7: Remove the facial and wash your face with a wash cloth.
Step 8: Enjoy your soft skin!
Tips and warnings:
~The smaller the oats, the better. Bigger oats tend to slide off of the face more easily
~Add cucumber slices to your eyes for a more traditional look.
~Organic products work best!
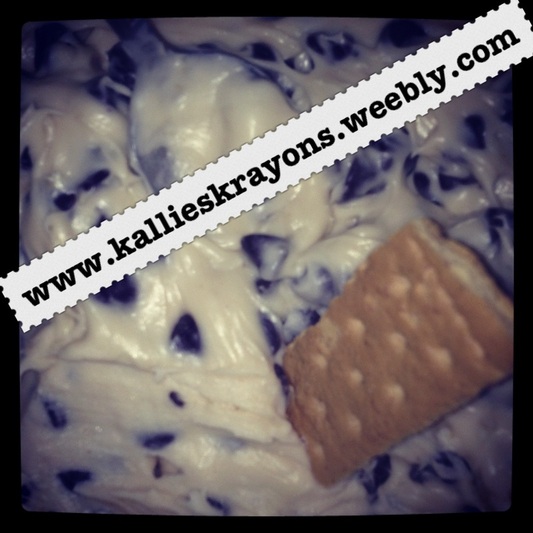
Insta-cake!

I know this doesn't look very appetizing, but it was absolutely delicious. It is also uniced in this photo.
What you'll need:
A large mug
A spoon
A rubber spatula
A measurment tablespoon
6 tablespoons of sugar
2 tablespoons of flour
1 tablespoon of vegetable oil
2 tablespoons of cocoa powder (I used unsweetened)
1 egg
1 tablespoon of milk
A microwave
Icing
Step 1: Put all ingredients into a large mug.
Step 2: Stir VERY thouroughly. You dont want any flour clumps.
Step 3: Microwave for 2-3 minutes.
Step 4: Insert a toothpick into the cake to check if it is done.
Step 5: Let it cool down.
Step 6: Apply icing (Optional).
Step 7: Enjoy!
Newspaper Nails

What you'll need:
Rubbing alcohol
A small cup
A nail polish base (optional)
White or grey nail polish
Clear nail polish
A page of a newspaper
Scissors
Step 1: Pour a small amount of rubbing alcohol into a small cup. (Enough to dip nails or newspaper bits into).
Step 2: Make sure your nails are clean and dry.
Step 3: Cut 10 rectangular sections of newspaper with typed words on it small or large enough to cover your nail.
Step 4: Paint your nails white or grey. (Or any color really. White and grey makes nails look more like a real newspaper). Let your nails dry COMPLETELY.
Step 5: Either dip your nails or the newspaper sections into the rubbing alcohol for 5 seconds. (Results depend on the quality of nail polish you used). For me, dipping the paper in the alcohol gave the best results.
Step 6: Apply the paper to your nails and press down firmly on all areas of the nails for 5 seconds.
Step 7: Apply a clear top coat and let it dry completely.
Send in your nail creations at the bottom of this page inspired by the picture above to be on this website! Thanks!
Chocolate Chip Cheesecake Dip
What you'll need:
8 ounces of softened creem cheese
1/2 cup of butter
3/4 cup of powdered sugar
2 tablespoons of brown sugar
1 teaspoon of vanilla
1 cup of mini chocolate chips
Graham crackers
A bowl
Measuring cups and spoons
A spoon
Electric beater
Step 1: Beat together the cream cheese and butter until smooth.
Step 2: Add both sugars and vanilla.
Step 3: Stir in the mini chocolate chips.
Step 4: Refrigerate until ready to eat. Serve with graham crackers.
Step 5: Enjoy!
Galaxy Nails
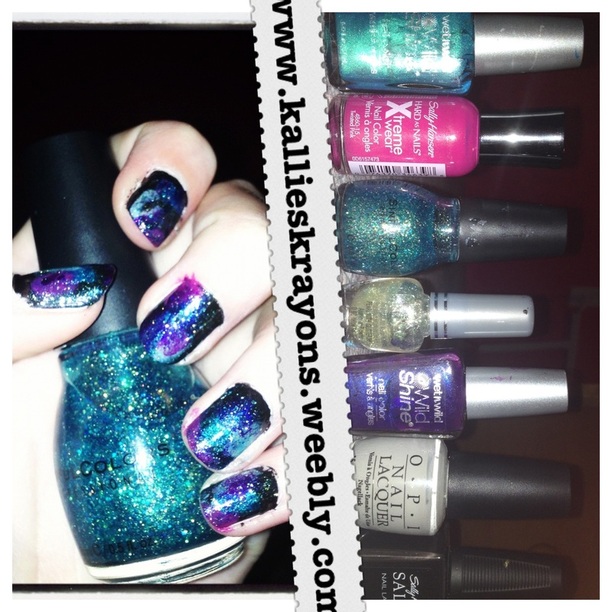
What you'll need: Nail polishes:
~Shiny teal or blue teal
~Light pink
~Clear small sparkles
~Clear or transparent blue/green with big sparkles
~Dark purple
~Light Grey
~Black
Unused make up wedge sponges or an unused round make up pad.
Optional: Apply a base coat.
Step 1: Paint all nails completely black. Let them fully dry.
Step 2: Use one side of the wedge sponge or a section of your round pad to start blotting or sponging on the teal or blue/green polish.
Step 3: Next, blend on the grey paint.
Step 4: Next blend light pink, and then finally the dark purple.
Step 5: Let the blotted on colors dry completely and then apply the smaller sparkles nail polish.
Step 6: Finally, apply the clear or transparent blue/green paint with the larger sparkles.
Optional: Apply a top clear coat.
Step 7: Remove any unwanted paint on your skin. (Sorry for my sloppiness in the photo above).
Send in your nail creations at the bottom of this page inspired by the picture above to be on this website! Thanks!
Nail Whitener
Upon removing lots of nail polish or just a dark color, your nails appear to have turned yellow. Don't worry, this is an easy fix.
What you'll need:
Peroxide
Baking Soda
A bowl
Step 1: Make a paste using 1 tablespoon of peroxide and 2 and 1/4 tablespoons of baking soda.Mix well.
Step 2: Apply paste to nails for 10-15 minutes.
Step 3: Wash off the paste and voila! You have white nails!
What you'll need:
Peroxide
Baking Soda
A bowl
Step 1: Make a paste using 1 tablespoon of peroxide and 2 and 1/4 tablespoons of baking soda.Mix well.
Step 2: Apply paste to nails for 10-15 minutes.
Step 3: Wash off the paste and voila! You have white nails!
Teeth Whitener
Step 1: Put a little bit of toothpaste into a small cup or bowl.
Step 2: Mix in 1 and 1/2 teaspoons of baking soda.
Step 3: Mix in 1/2 teaspoon of water.
Step 4: Thoroughly mix.
Step 5: Brush your teeth for 2 minutes.
Tips: ~Do this once a week until you have reached the results you want.
~Once your teeth are white, limit yourself to using this whitening treatment once every month or two.
Geometric Nails
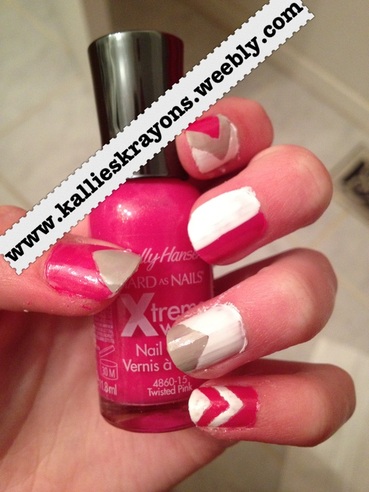
This is a VERY simple and cute nail style!
What you'll need:
3 colors of nail polish
Tape
Step 1: Use a base coat. For the thumb and ring finger, tape the corner of the tape to your nail. Then, paint over it.
Once that is dry, peel the tape off and carefully fill in your blank nail with another color.
Step 2: For the middle finger, place tape vertically along your nail and paint over the tape with one color.
Again, once that is dry, peel the tape off and carefully fill in your blank nail with another color.
Step 3: For the index and pinky finger, tape a corner on your nail and paint over it. Once dry, peel off and place another corner further up on your nail and carefully fill in that blank portion of your nail. Repeat as many times as you want and experiment with placing the tape at different angles.
Step 4: Apply a top coat!
Send in your nail creations at the bottom of this page inspired by the picture above to be on this website! Thanks!
Orange Candle
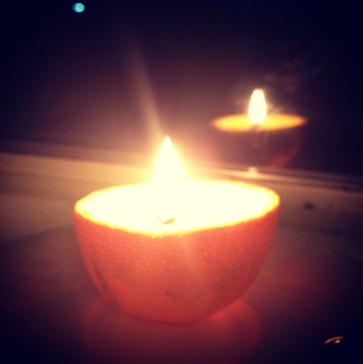
What you'll need:
An orange, lemor, grapefruit, etc.
A knife
Any kind of oil
Matches
Step 1: Cut out and eat the fruit and remember to leave the middle stem section intact.
Step 2: Fill the now empty orange with oil of your choice just below the tip of the "wick".
Step 3: Light the stem and enjoy!
Optional step 4: Use the other half the same way or cut out the stem or "wick" and cut a circular whole where the "wick" at the top would be and use this half as a cover.
